
 Home
HomeMesh Modding with Blender -- Mesh Modding without Blender, using Xna Posing Studio -- XPS
Page 1 of 1

20100703
Mesh Modding with Blender -- Mesh Modding without Blender, using Xna Posing Studio -- XPS
Placeholder for the Table of contents
Last edited by XNAaraL on Thu Sep 15, 2011 1:34 pm; edited 1 time in total

XNAaraL- XNALara teacher

-
 Сообщения : 766
Location : Аргентина
Share this post on:
Mesh Modding with Blender -- Mesh Modding without Blender, using Xna Posing Studio -- XPS :: Comments
![]() Sat Jul 03, 2010 7:12 pm by XNAaraL
Sat Jul 03, 2010 7:12 pm by XNAaraL
Blender 2.5/2.6
What is new in the next Blender version:
Cloth Simulation
Blender description Cloth Simulation

Going over how to do a cloth and collision simulation in blender 2.5 For more
Texture painting with Gimp
The same with ZBrush
![]() Wed Aug 04, 2010 6:32 pm by XNAaraL
Wed Aug 04, 2010 6:32 pm by XNAaraL
Making Alister without glass and with hat

TIME TAKEN: 6 minutes
TOPICS COVERED:
Short Description:
Step-by-step for Blender
1. Install all tools. Read Part 1. Preparation of work place. by AtlantiB in Educational Section :: Mesh modding on-line courses :: Part1 http://xnalara.home-forum.com/part1-f13/
2. Watch the video by AtlantiB, Lesson 1. No gear
3. Watch the video by AtlantiB, Lesson 3. Lightmaps
Convert Alister as Generic_Item.mesh. Load Alister in XNALara. In the main window, hit the function key F11
4.00
Use as filename: Generic_Item ! The extension .mesh.ascii addet XNALara automatical
4.01
Open Blender and delete the cube. (Shortcut X)
4.02
Confirm the deletion. with Return or left mouse click. (ESC or right mouse button are chancel)
4.03
Now, you have a clean workspace. You can use the key's <Ctrl> U to save this as default settings.
4.04
Import Alister as Generic_Item in Blender with bones (File->Import->MeshAsciiExt).
4.05
Change to the directory with Alister. A directory is selected by clicking on the arrows below the P.
4.06
Choose Generic_Item.mesh.ascii and hit Import and Ok.
4.07
Blender has reported a warning! Each warning in Blender generates an error in XNALara!
4.08
Switching to the second Blender window. The texture image eyeballs_diffuse.png are missing. No problem. Delete the eyeballs or make a transparent texture ( with environment reflections).
4.09
Switch the view to Front View (shortcut: Numpad 1)
4.10
Split window area. Move the mouse to the top border of main window. Hit <RMB> (right mouse button) and use split aera. Hit <LMB> (left mouse button) move the mouse and hit <LMB>
4.11
Switch to outliner view.
4.12
Select with <LMB> the meshpart 7_eyeballs
4.13
Test: Hit g and move the mouse. Chancel with <RMB>
4.14
I have center the view with view->ViewSelected (shortcut: Numpad . equal Point - In no english countries: shortcut , equal Comma)
4.15
Delete the unused eyeballs, or make a transparency image with reflections. Remove glass and frame ;-)
4.16
Confirm
4.17
If you want to see the textures, switch Draw Type textured - Or Draw Type Wireframe by 4.16 - 4.17 ;-)
4.18
Result
4.19
Not necessary but useful: Switching to layer 2 ! Short key 2 or <LMB>
4.20
Import the hat made by AtlantiB as MeshAsciiExt or MeshAscii
4.21
Search the folder
4.22
Choose Generic_Item.mesh.ascii
4.23
Select the root bone from hat with <LMB> in the outliner window to armature.001
4.24
or <RMB> at the small stick in the 3D window.
4.25
Test with <g> move mouse
4.26
Delete this bone with the hotkey X
4.27
Confirm :-)
4.28
Make both layer visible. Hold the Shift key down and <LMB> to the layer 1 sign.
4.29
Select hat and feather (Hold shift key down and click with the right mouse button) and move both to the head (Hit the key's G and Z and move the mouse)
4.30
Turn the mouse wheel to zoom
4.31
Match in the front view. <.> and Numpad 1
4.32
Match in the side view. Numpad 3 or View->Side
4.33
Turn the view by holding down the mouse wheel and move the mouse.
Switch to the Edit-Supmenu (shortcut <Tabulator>
4.34
Now make the hat poseable Join the hat with the head neck upper bone
4.35
Hit the button New
4.36
Write exact head neck upper
4.37
Hit assign ! You see no result If you want this, switch to the WeightPaint-Submode with <Ctrl> <Tab> . If you select the "head neck upper" bone, the you can see a other color (bone weight)
4.38
The same with the feather mesh part
4.39
<RMB>
4.40
<Tab>
4.41
New button
4.42
head neck upper No warning
4.43
OK: "head neck upper"
4.44
Assign
4.45
You know, no result are visible!
4.46
Retry not needet
4.47
Export the MOD with File->Export->MeshAsciiExt (bones)
4.48
as XNALara file Generic_Item.mesh.ascii in a new folder !
4.49
A warning are popup !!!! Every warning is a error !!!!!
4.50
Check the console window. Programer language. Something with root bone and armature. Maybe you have written "head neck upper" wrong, OR
4.51
You have exported the model with spliting window !! Join the 2 windows ! <RMB> to the border.


And try agin
4.53
No warning
4.54
Not necessary, but useful: The camera pivots complement and bring in the right order. The Download Link for the tool AddCameraTargets.exe is in the thread News
4.55
Now convert the Generic_Item.mesh.ascii to the XNALara format Generic_Item.mesh. Use the Tool GeMeshAsciiToBin.exe (Drag the .mesh.ascii over the .exe icon or use "<RMB>Open with"
4.56
Not necessary, but useful: The tool ModPublisher.exe search and copy all for the MOD needed files in a nerw folder.
4.57
The new generated folder
4.58
Textures from Hat-MOD and from Alister-model, a readme.txt and the Generic_Item.mesh
4.59
Works fine in XNALara. Zip the generated folder. Type www.sendspace.com . Publish the Download Link and the image. Your first MOD
4.60
Save the MOD as .blend file !!! Use F2. Write AlisterWithHat_001 . If you want a new save, then hit F2 and + . The new filename are now AlisterWithHat_002
==============================================
Now we do the hat hidden in XNALara. He is then diplayed with
==============================================
Select the hat with <RMB>
4.61
In the field "Link and Materials" change the Object name to thorgauntletleft
4.62
Select the feather with <RMB>
4.63
In the field "Link and Materials" change the Object name to thorgauntletright
4.64
Export
4.65
as Generic_Item.mesh.ascii
4.66
Save in Blender Format for future changes
4.67
Hit +
4.68
Convert with GeMeshAsciiToBin.exe . Test in XNALara: Hat and fearther are hidden
4.69
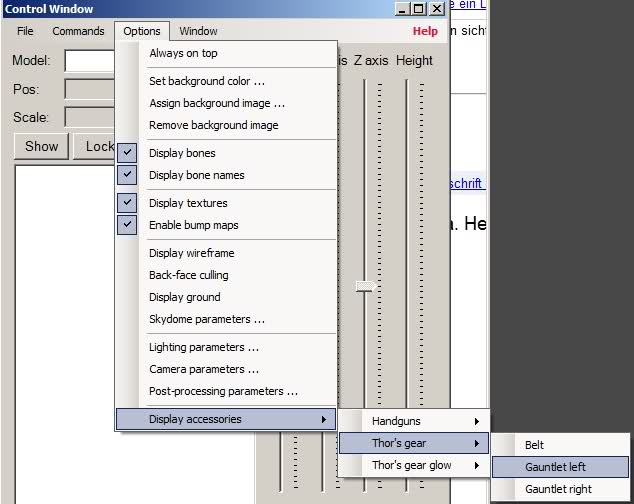
Options->Display->Asseccories
4.70
In XNALara is a error dialog popup This mean: Not enough textures. No problem. (Watch the video by AtlantiB )
4.65
4.66
4.67
4.68
4.69
4.70
4.71
4.72
Ups, not the hat_bump.png ! choose hat_lightmap.png !!! (Making the texture, watch the video by AtlantiB )
4.73
The texture order for thor's gauntlets are: _diffuse _lightnap _bump !!!

Switch to the material view
4.74
Hit UV
4.75
4.76
4.77
4.78
4.79
4.80
The final export as Generic_Item.mesh.ascii !
4.81
4.82
4.83
4.84
4.85
4.86
XNALara Options->DisplayAsseccories->GauntletLeft
4.87
Works fine


Finish
Last edited by XNAaraL on Sat Aug 07, 2010 4:17 pm; edited 20 times in total
TIME TAKEN: 6 minutes
TOPICS COVERED:
- Remove mesh parts (noGear)
- Combining two models
- Making static objects poseable (hat and feather)
- Split and join Blender windows
Short Description:
- 4.00 - 4.01: Convert Alister as Generic_Item.mesh
- 4.05: Import Alister as Generic_Item in Blender with bones (File->Import->MeshAsciiExt).
- 4.15: Remove the the glass , frame and unused eyeballs with hotkey X
- 4.20 - 4.23: Import the hat (made by AtlantiB) in Blender.
- 4.24 - 4.28: Remove the root bone from hat model with hotkey X
- 4.30 - 4.33: Move the hat to alisters hair with the hotkey's G and Z (Go in Z-Direction)
- 4.37 - 4.47: Make the hat and feather poseable. In Edit Mode use new "head neck upper" and hit assign
- 4.48: Export the model as Generic_Item.mesh.ascii
- 4.56: Convert the result to Generic_Item.mesh with GeMeshAsciiToBin.exe
- ?.??: Make a Download Link
Step-by-step for Blender
1. Install all tools. Read Part 1. Preparation of work place. by AtlantiB in Educational Section :: Mesh modding on-line courses :: Part1 http://xnalara.home-forum.com/part1-f13/
2. Watch the video by AtlantiB, Lesson 1. No gear
3. Watch the video by AtlantiB, Lesson 3. Lightmaps
Convert Alister as Generic_Item.mesh. Load Alister in XNALara. In the main window, hit the function key F11
4.00
Use as filename: Generic_Item ! The extension .mesh.ascii addet XNALara automatical
4.01
Open Blender and delete the cube. (Shortcut X)
4.02
Confirm the deletion. with Return or left mouse click. (ESC or right mouse button are chancel)
4.03
Now, you have a clean workspace. You can use the key's <Ctrl> U to save this as default settings.
4.04
Import Alister as Generic_Item in Blender with bones (File->Import->MeshAsciiExt).
4.05
Change to the directory with Alister. A directory is selected by clicking on the arrows below the P.
4.06
Choose Generic_Item.mesh.ascii and hit Import and Ok.
4.07
Blender has reported a warning! Each warning in Blender generates an error in XNALara!
4.08
Switching to the second Blender window. The texture image eyeballs_diffuse.png are missing. No problem. Delete the eyeballs or make a transparent texture ( with environment reflections).
4.09
Switch the view to Front View (shortcut: Numpad 1)
4.10
Split window area. Move the mouse to the top border of main window. Hit <RMB> (right mouse button) and use split aera. Hit <LMB> (left mouse button) move the mouse and hit <LMB>
4.11
Switch to outliner view.
4.12
Select with <LMB> the meshpart 7_eyeballs
4.13
Test: Hit g and move the mouse. Chancel with <RMB>
4.14
I have center the view with view->ViewSelected (shortcut: Numpad . equal Point - In no english countries: shortcut , equal Comma)
4.15
Delete the unused eyeballs, or make a transparency image with reflections. Remove glass and frame ;-)
4.16
Confirm
4.17
If you want to see the textures, switch Draw Type textured - Or Draw Type Wireframe by 4.16 - 4.17 ;-)
4.18
Result
4.19
Not necessary but useful: Switching to layer 2 ! Short key 2 or <LMB>
4.20
Import the hat made by AtlantiB as MeshAsciiExt or MeshAscii
4.21
Search the folder
4.22
Choose Generic_Item.mesh.ascii
4.23
Select the root bone from hat with <LMB> in the outliner window to armature.001
4.24
or <RMB> at the small stick in the 3D window.
4.25
Test with <g> move mouse
4.26
Delete this bone with the hotkey X
4.27
Confirm :-)
4.28
Make both layer visible. Hold the Shift key down and <LMB> to the layer 1 sign.
4.29
Select hat and feather (Hold shift key down and click with the right mouse button) and move both to the head (Hit the key's G and Z and move the mouse)
4.30
Turn the mouse wheel to zoom
4.31
Match in the front view. <.> and Numpad 1
4.32
Match in the side view. Numpad 3 or View->Side
4.33
Turn the view by holding down the mouse wheel and move the mouse.
Switch to the Edit-Supmenu (shortcut <Tabulator>
4.34
Now make the hat poseable
4.35
Hit the button New
4.36
Write exact head neck upper
4.37
Hit assign ! You see no result
4.38
The same with the feather mesh part
4.39
<RMB>
4.40
<Tab>
4.41
New button
4.42
head neck upper
4.43
OK: "head neck upper"
4.44
Assign
4.45
You know, no result are visible!
4.46
Retry not needet
4.47
Export the MOD with File->Export->MeshAsciiExt (bones)
4.48
as XNALara file Generic_Item.mesh.ascii in a new folder !
4.49
A warning are popup !!!! Every warning is a error !!!!!
4.50
Check the console window. Programer language. Something with root bone and armature. Maybe you have written "head neck upper" wrong, OR
4.51
You have exported the model with spliting window !! Join the 2 windows ! <RMB> to the border.
And try agin
4.53
No warning
4.54
Not necessary, but useful: The camera pivots complement and bring in the right order. The Download Link for the tool AddCameraTargets.exe is in the thread News
4.55
Now convert the Generic_Item.mesh.ascii to the XNALara format Generic_Item.mesh. Use the Tool GeMeshAsciiToBin.exe (Drag the .mesh.ascii over the .exe icon or use "<RMB>Open with"
4.56
Not necessary, but useful: The tool ModPublisher.exe search and copy all for the MOD needed files in a nerw folder.
4.57
The new generated folder
4.58
Textures from Hat-MOD and from Alister-model, a readme.txt and the Generic_Item.mesh
4.59
Works fine in XNALara. Zip the generated folder. Type www.sendspace.com . Publish the Download Link and the image. Your first MOD
4.60
Save the MOD as .blend file !!! Use F2. Write AlisterWithHat_001 . If you want a new save, then hit F2 and + . The new filename are now AlisterWithHat_002
==============================================
Now we do the hat hidden in XNALara. He is then diplayed with
==============================================
Select the hat with <RMB>
4.61
In the field "Link and Materials" change the Object name to thorgauntletleft
4.62
Select the feather with <RMB>
4.63
In the field "Link and Materials" change the Object name to thorgauntletright
4.64
Export
4.65
as Generic_Item.mesh.ascii
4.66
Save in Blender Format for future changes
4.67
Hit +
4.68
Convert with GeMeshAsciiToBin.exe . Test in XNALara: Hat and fearther are hidden
4.69
Options->Display->Asseccories
4.70
In XNALara is a error dialog popup
4.65
4.66
4.67
4.68
4.69
4.70
4.71
4.72
Ups, not the hat_bump.png ! choose hat_lightmap.png !!! (Making the texture, watch the video by AtlantiB
4.73
The texture order for thor's gauntlets are: _diffuse _lightnap _bump !!!
Switch to the material view
4.74
Hit UV
4.75
4.76
4.77
4.78
4.79
4.80
The final export as Generic_Item.mesh.ascii !
4.81
4.82
4.83
4.84
4.85
4.86
XNALara Options->DisplayAsseccories->GauntletLeft
4.87
Works fine
Finish
Last edited by XNAaraL on Sat Aug 07, 2010 4:17 pm; edited 20 times in total
![]() Wed Aug 04, 2010 6:40 pm by Guest
Wed Aug 04, 2010 6:40 pm by Guest
Thanks for this Incredible Tutorial

![]() Mon Aug 09, 2010 8:26 am by Evgelina
Mon Aug 09, 2010 8:26 am by Evgelina
Простите, но у меня нету такого как - Import - Generic_Item.mesh.ascii нету формата нужного...
![]() Mon Aug 09, 2010 8:48 am by Guest
Mon Aug 09, 2010 8:48 am by Guest
English please or Add English aswell 
![]() Mon Aug 09, 2010 6:51 pm by Evgelina
Mon Aug 09, 2010 6:51 pm by Evgelina
OK. Look - http://s55.radikal.ru/i149/1008/ee/2a5d6172709d.jpg

![]() Mon Aug 09, 2010 7:05 pm by Anilorak
Mon Aug 09, 2010 7:05 pm by Anilorak
Надо сперва скрипты установить!!!!
![]() Mon Aug 09, 2010 7:40 pm by XNAaraL
Mon Aug 09, 2010 7:40 pm by XNAaraL
Evgelina wrote:Простите, но у меня нету такого как - Import - Generic_Item.mesh.ascii нету формата нужного...
Read this ;-)
1. Install all tools. Read Part 1. Preparation of work place. by AtlantiB in Educational Section :: Mesh modding on-line courses :: Part1 http://xnalara.home-forum.com/part1-f13/
Right. ExactAnilorak wrote:Надо сперва скрипты установить!!!!

![]() Thu Aug 12, 2010 7:11 pm by mjolnirs
Thu Aug 12, 2010 7:11 pm by mjolnirs
Thanks for the tutorial!  saludos.
![]() Thu Aug 26, 2010 10:01 am by ?????
Thu Aug 26, 2010 10:01 am by ?????
XNAaraL that tutorial is really difficult to follow There is no text or anything showing what to do and the images are really small! And it seems very long, to do something so simple  Sorry
Sorry
![]() Thu Aug 26, 2010 10:25 am by XNAaraL
Thu Aug 26, 2010 10:25 am by XNAaraL
Thanks for the constructive criticism. The tutorial are a request by daventry:Bill wrote:XNAaraL that tutorial is really difficult to follow
daventry wrote:Explain to me In Detail on what i must get and what i must do, to turn Alister into this https://2img.net/r/ihimizer/img683/2725/79614195.jpg by Removing the Glasses/Rings/Necklace/Clothes and add Boots/Shirt/Pants.
Also, how do i make his Hair Grey and give him an Older Face and put this Hat by Atlantib http://i068.radikal.ru/1007/fd/51f439db380a.jpg as a Thor Gear on his Head.
Click on the images. The tumbnails are the Link to the fullsize Images.
The Text are before the images, sometimes on the image self.
<Tab> means: Hit the Tabulator key. <RMB> means: Press the Right Mouse Button ...
Not many text ;-) but explain in Detail on what you must get and what you must do :-)
It is easy to follow. daventry have make with this tutorial his first MOD. Without any prior knowledge! Here are so mutch images because every step (keystroke) are a new image. On the top (short desciption) are some links to the tutorials and videos made by AtlantiB. These explain exactly the various steps. With good english text and voice.

MOD Alister No Glasses by daventry

MOD Old Face & Grey Hair Alister with Hat by daventry
![]() Thu Aug 26, 2010 10:56 am by ?????
Thu Aug 26, 2010 10:56 am by ?????
Ahh ok I understand now!
![]() Tue Sep 13, 2011 5:02 pm by XNAaraL
Tue Sep 13, 2011 5:02 pm by XNAaraL
How to make seam less mesh parts?
Application: XPS version 5.7 - May 2009
NormalCopy_files.zip (19.99 MB)
Maybe you has this problem:

To mesh parts, Blender call this objects. You can see the mesh seams
You can try to hide the seams, using a texture:

Very difficulte
Or you can use XPS the Xna Posing Studio and Blender

Three mesh parts (head eyes and mouth) and no seams

Now step by step (56 images)
Please downlod the images to your hard disk. My internet connection are slowly thsi day. NormalCopy_files.zip (19.99 MB) [url=http://www.multiupload.com/L1WOBWGW8W]http://www.multiupload.com/L1WOBWGW8W
Step 1:
Join the mesh parts with Blender.

Images 0 - 5
Step 2:
Remove double vertices with the setting "value zero".

Images 6 - 10
Step 3:
If necessary, recalculate the normals.
Image 11
Step 4:
Export this model with the exporter by Dusan http://www.mediafire.com/?mmd2dwtnlyt as static Static_Normals.mesh.ascii , because many times, this mesh has to many bones attached. Convert the .mesh.ascii file with GeMeshAsciiToBin ( version 1) as .mesh file.
The version 1 are included inside XPS since version 10.6
Invoke the menu item XPS-->Modify-->Save_Generic-->use_old_generic_format

Image 12 - 15
Ignore the warning about to many materials, because XPS use a new Generic_Item format. not released at this time, because the Blender exporter to handle more then one material, are not finished.
XPS
Use XPS and copy the smoothed normals from the static 'all in one' model to the poseable model 'with many meshparts'.
Step 5:
Load the poseable character into XPS and split it to 2 new models.
- The model body, this is the part to fix the seams.
- The model outfit, this is the part with perfect normals.

Image 12 - 18
Step 6:
Hide all parts parts to fix.
Toggle the button Visible and choose the 'Drop down' box to select the mesh parts.
In this issue: Hide the body and show the cloths. This feature is publicly available since XPS 10.5
Invoke the button "Merge" to save only the visible mesh parts !!!! Image 21

Image 18 - 21
Step 7:
Save this model as Generic_Item.mesh .
Images 22 -23
Step 8:
Invert the visibilty

Image 24
Step 9:
Save the body (parts with seams)
Images 25-28
Step 10:
Exit XPS !!!!! and start it again to clear the memory.
Load now the static model with smooth meshpart, made with Blender following the steps 1 - 4 ('join mesh parts').
Images 29-30
Step 11:
Press the buttons "skinning" and "skinning only exact".
Skinning are the same like Blenders "Bone weight copy"
"skinning only exact" switch to the "Normals vector copy" feature.
!!!!!!!!!!!!!!!!!!!!!!!!!!

!!!!!!!!!!!!!!!!!!!!!!!!!!
Images 31 - 32
Step 12:
Load the poseable model. On this stage, XPS copy the normals from static model to the poseable model. Very fast
Images 34 - 35
Step 13:
Select the poseable model.

Images 36 - 27
Step 14
Save the poseable model as Body.mesh.
Images 38 - 39
Step 15
Exit XPS and start it again. Now you can merge the outfit with the finished body.
Image 40
Step 16:
Load outfit and body.
Images 41 - 44
Step 17:
Press "Merge" to merge both models as new one.
Image 45

And save the character as Generic_Item.mesh .
Important:
Convert the Generic_Item.mesh to Generic_Item.mesh.ascii and back to Generic_Item.mesh, because the old Generic_Item format before XPS 10.7 needs a recalculate the 'tagent space' for correct shading inside XNALara. GeMeshAsciiToBin.exe make this calculation based on the 'normal vectors' !
Images 46 - 47
Step 18:
As always ModPublisher for copy all the textures.

Image 48
Step 19:
Test it with the offical XPS 10.5 version.


Images 49-51
Step 20:
Fix some texture seams with Blender "Texture Paint" or ZBrush.
Images 52 - 55
Finish

Last edited by XNAaraL on Fri May 11, 2012 6:43 pm; edited 11 times in total
Application: XPS version 5.7 - May 2009
NormalCopy_files.zip (19.99 MB)
Maybe you has this problem:
To mesh parts, Blender call this objects. You can see the mesh seams
You can try to hide the seams, using a texture:
Very difficulte
Or you can use XPS the Xna Posing Studio and Blender
Three mesh parts (head eyes and mouth) and no seams
Now step by step (56 images)
Please downlod the images to your hard disk. My internet connection are slowly thsi day. NormalCopy_files.zip (19.99 MB) [url=http://www.multiupload.com/L1WOBWGW8W]http://www.multiupload.com/L1WOBWGW8W
Step 1:
Join the mesh parts with Blender.
Images 0 - 5
Step 2:
Remove double vertices with the setting "value zero".
Images 6 - 10
Step 3:
If necessary, recalculate the normals.
Image 11
Step 4:
Export this model with the exporter by Dusan http://www.mediafire.com/?mmd2dwtnlyt as static Static_Normals.mesh.ascii , because many times, this mesh has to many bones attached. Convert the .mesh.ascii file with GeMeshAsciiToBin ( version 1) as .mesh file.
The version 1 are included inside XPS since version 10.6
Invoke the menu item XPS-->Modify-->Save_Generic-->use_old_generic_format
Image 12 - 15
Ignore the warning about to many materials, because XPS use a new Generic_Item format.
XPS
Use XPS and copy the smoothed normals from the static 'all in one' model to the poseable model 'with many meshparts'.
Step 5:
Load the poseable character into XPS and split it to 2 new models.
- The model body, this is the part to fix the seams.
- The model outfit, this is the part with perfect normals.
Image 12 - 18
Step 6:
Hide all parts parts to fix.
Toggle the button Visible and choose the 'Drop down' box to select the mesh parts.
In this issue: Hide the body and show the cloths. This feature is publicly available since XPS 10.5
Invoke the button "Merge" to save only the visible mesh parts !!!! Image 21
Image 18 - 21
Step 7:
Save this model as Generic_Item.mesh .
Images 22 -23
Step 8:
Invert the visibilty
Image 24
Step 9:
Save the body (parts with seams)
Images 25-28
Step 10:
Exit XPS !!!!! and start it again to clear the memory.
Load now the static model with smooth meshpart, made with Blender following the steps 1 - 4 ('join mesh parts').
Images 29-30
Step 11:
Press the buttons "skinning" and "skinning only exact".
Skinning are the same like Blenders "Bone weight copy"
"skinning only exact" switch to the "Normals vector copy" feature.
!!!!!!!!!!!!!!!!!!!!!!!!!!
!!!!!!!!!!!!!!!!!!!!!!!!!!
Images 31 - 32
Step 12:
Load the poseable model. On this stage, XPS copy the normals from static model to the poseable model. Very fast
Images 34 - 35
Step 13:
Select the poseable model.
Images 36 - 27
Step 14
Save the poseable model as Body.mesh.
Images 38 - 39
Step 15
Exit XPS and start it again. Now you can merge the outfit with the finished body.
Image 40
Step 16:
Load outfit and body.
Images 41 - 44
Step 17:
Press "Merge" to merge both models as new one.
Image 45
And save the character as Generic_Item.mesh .
Important:
Convert the Generic_Item.mesh to Generic_Item.mesh.ascii and back to Generic_Item.mesh, because the old Generic_Item format before XPS 10.7 needs a recalculate the 'tagent space' for correct shading inside XNALara. GeMeshAsciiToBin.exe make this calculation based on the 'normal vectors' !
Images 46 - 47
Step 18:
As always ModPublisher for copy all the textures.
Image 48
Step 19:
Test it with the offical XPS 10.5 version.
Images 49-51
Step 20:
Fix some texture seams with Blender "Texture Paint" or ZBrush.
Images 52 - 55
Finish
Last edited by XNAaraL on Fri May 11, 2012 6:43 pm; edited 11 times in total
![]() Tue Sep 13, 2011 9:11 pm by AtlantiB
Tue Sep 13, 2011 9:11 pm by AtlantiB
yeah!!! it works!!!!! thanks yoou!
![]() Sat Sep 15, 2012 2:24 pm by alpha920
Sat Sep 15, 2012 2:24 pm by alpha920
a lot of the images no longer showup, all I see are red X's.
![]() Mon Sep 17, 2012 7:12 am by XNAaraL
Mon Sep 17, 2012 7:12 am by XNAaraL
Right. The image hoster are down for ever. All images have been lost.
» Help with exporting as .mesh 2.74 Blender~
» Seperating Joined parts on a mesh in blender
» how to convert mesh.ascii format to obj in blender or lightwave ? plese
» XNA Posing Studio 10.7.1
» XNA Posing Studio 10.3.6
» Seperating Joined parts on a mesh in blender
» how to convert mesh.ascii format to obj in blender or lightwave ? plese
» XNA Posing Studio 10.7.1
» XNA Posing Studio 10.3.6
Permissions in this forum:
You cannot reply to topics in this forum|
|
|